Designing schedule management
Before you can use schedule management in Web Access, you need to make some design changes.
For more information about using the designers, see What are the Designers?.
Making an object schedulable
The first stage of enabling schedule management for an object is to make the object schedulable using Object Designer to add the Schedulable behavior.
If you make Configuration Management\Configuration Item or System\User schedulable, then the objects that are inherited from them (for example, Service and Analyst) are also made schedulable.
To make an object schedulable:
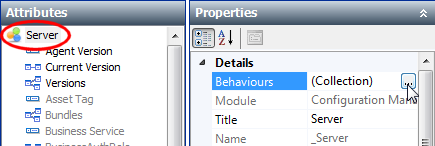
- In Object Designer, open the required business object.
- Select the object at the top of the Attributes tree, then click
 alongside Behaviors in the Properties grid.
The Behavior Selection dialog appears.
- In the Available Items list, select Schedulable, then click
 .
.
Schedulable moves to the Selected Items list. - Click OK, then click
 .
.
The changes are saved, and a collection relationship is added to a new Appointment object that was created when you saved the changes.

Adding a calendar to an object's window
After you have added the Schedulable behavior to an object to create the Appointment object and the Appointments collection, you can use Window Manager to add a calendar to the object's window. You do this by adding the Appointments collection to the object's window. However, unlike for other collections, the Appointments collection appears at runtime as a calendar rather than as a list.
The calendar does not appear on windows in the Ivanti Console.
To add the Appointments calendar to a window:
- In Window Manager, open the window for the object that has had the Schedulable behavior set in Object Designer.
- In the Attributes tree, double-click the
 Appointments collection.
A new Appointments collection appears at the bottom of the window. - Click .
Creating Appointment windows for your schedulable objects
When you make an object schedulable, a new Appointment object and Add Appointment action are created. You then need to create a Web Access window for each of these Appointment objects using Window Manager. This is the window that appears when users click the Add Appointment action in Web Access.
When you create an Appointment window, include only the Start Datetime, End Datetime, and Title fields. You can optionally include the Description field, but do not include any of the other fields.
Make sure you make a Web Access version of the window using the Make available in Web Access action.
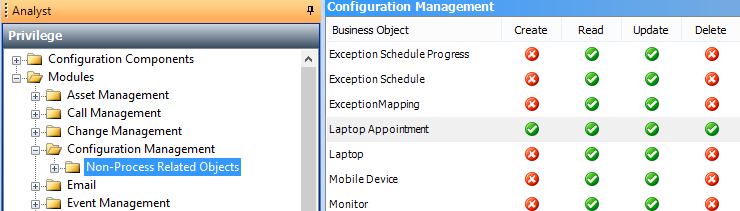
Privileges for schedule management
If you have the appropriate privileges, you can drag appointments that appear on a Calendar gadget to move them to a different time. You need to have the Create, Read, Update, and Delete privilege for the appropriate Appointment object under Non-Process Related Objects. For example, to move an appointment for a Laptop, you need these privileges set for Modules\Configuration Management\Non-Process Related Objects\Laptop Appointment.
This privilege enables analysts to move appointments that they have created themselves. You can also enable analysts to move appointments created by other users using the User Group window in the Administration component.
You may need to add the attribute Can Modify Appointments as a check box to the System\User Group window using Window Manager.
To enable analysts to modify appointments created by other users:
- In the Administration component of the Ivanti Console, display the User Managment tree, and expand the Users\Analyst branch.
- Expand the branch for the appropriate analyst and expand the Groups branch.
- Under the Groups branch, select the group that you want to enable the analyst to update appointments from, then in the Actions list, click Modify User Group.
The User Group window appears.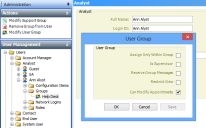
- Select the Can Modify Appointments check box, then click OK.
When the analyst's current group is set to the group selected above in Web Desk, they can move appointments created by other users. - Repeat this procedure for other analysts as required.
